Thanks for stopping by and spending a moment to read my blog. I am just a simple mom, like you, doing the best she can to raise her children to be happy, healthy, Jesus-loving little humans. I hope that I can pass along to you some of what has been helpful to me. Enjoy & thank you for your comments and words of encouragement when you like what you read. :)

Friday, October 11, 2013

Orange Creme Sorbet

Made from real oranges, tastes just like Orange Julius! 

Orange Creme Sorbet


Makes 1 quart

3-4 large naval oranges
1 tsp vanilla extract
1/2 cup sugar
1 cup vanilla yogurt

With electric juicer or citrus hand juicer, peel and juice oranges to yield 4 cups fresh juice. In a blender, mix together orange juice, sugar, vanilla and yogurt. Add to ice cream maker and chill for at least 1 hour after prepared for semi-soft consistency! You could also spoon prepared sorbet into popsicle molds and freeze until hard. 

Mexican Twice Baked Yams

Mexican Twice Baked Yams


Serves 4

2 medium yams (round & fat)
1 cup shredded mozzarella cheese
1/2 cup sour cream
1 can black beans, drained & rinsed
Approx. 1 cup salsa
Green onions

Bake yams at 350 until fork tender (1-2 hours). Cut in half and scoop out tender middle, leaving 1/4 inch around rim and bottom creating a bowl. Mash yam with cheese and sour cream. Scoop back into yam skins in heaping spoonfuls. Place in a glass baking dish or sheet pan and bake for an addional 15 minutes to melt cheese. Top with warm black beans, salsa and diced green onions. 

I started giving myself an allowance


Being a stay-at-home mom is no joke! We work from long hours, with few breaks and seldom get to take a sick day or vacation. Most of us chose to stay home love it and would tell you in a heartbeat that the benefits far outweigh the drawbacks. Lately my kids haven't been doing their chores - and with 6 of us in our family that meant a whole lot more work for me and one very tired mama. So, I made a list to show my kids everything I do each day and told them that whomever did each item on the list first each day would get a quarter. I put out jars and grabbed a handful of quarters and paid myself for all the chores I had done that day. Clink-clink-clink!! With the coins all deposited for the day I told them the list would be on the fridge from now on and I was no longer going to remind them more than once to get things done. I would pay them (and myself) in quarters at the end of every day. End of conversation. The next morning you should've seen my kids hustle about to do their chores! They've even been doing extra jobs! Whoop!! As their little jars get full I plan to count what they've made at the end of the week and allow them to keep or spend 70% (after 10% goes back to the church and 20% goes into savings). As for my own jar - it's a nice little incentive to get everything done each day. Even as a grown up its nice to have a little spending money! ;) 


Friday, October 4, 2013

25 Fun Things to Mail Besides a Letter

My four year old has recently become obsessed with sending and receiving mail. Some friends and I set up an impromptu mail club for our kids because, apparently he's not the only one who asks if there is anything for him every.single.day. Here is a list of fun things you can send in an envelope with just one stamp to send to a child in your life - trust me it will make their day!


  • Empty balloon 
  • Coloring page or activity page 
  • Mad libs 
  • Scavenger hunt list
  • Secret message (draw a picture or write a note with a white crayon, recipient colors on top with a marker to reveal the message) 
  • Recipe 
  • Pictures/photographs 
  • Postcards  
  • Coins for the piggy bank
  • Leaves or flowers
  • Make your own puzzle – cut a photo into pieces
  • Hangman Puzzle with a few letters filled in or clues
  • Words to a silly song
  • Jokes
  • Glitter 
  • Lotto scratch tickets
  • Stickers
  • Glow sticks
  • Googly eyes
  • Feathers 
  • Treasure map (look up a McDonalds (or other fun location) in the recipient’s city and help your child write out directions or draw a map of how to get to the secret spot, include a dollar to buy a “treasure” when they get there)
  • Packet of seeds to plant
  • List of favorite learning websites
  • Stencils
  • Origami paper with instructions for a simple creation

Family Devo and a Snow Day Challenge


I am the worst - I am not a fan of the cold and snow and am too quick to tell you how miserable I am. When we woke up to snow this morning (yes, on October 4th!!) I decided that I wasn't going to complain about it today. Sure enough my kiddos came in my room as soon as the sun was up this morning jumping up and down shouting, "It's snowing!" I squashed my thoughts of the extra work the morning would bring - the shoveling, the coats and boots and missing mittens, the roads. I made hot chocolate for them WITH marshmallows, tossed their blankets in the dryer and turned on a worship CD. The first snow of the year is fun for kids - I wasn't going to ruin their joy. As I was sipping my coffee and they were stating out the window a verse came to mind. (Sometimes teachable moments are more for us than our kids) 

"This is the day the Lord has made. We will rejoice and be glad in it." (Psalms 118:24 NLT)

I called my kids into the kitchen and set the time for 60 seconds. I told them we had 60 seconds to complain about why we don't like the cold and snow then we would only say good things about it the rest of the day. We took turns then when the timer went off we recited the verse several times together. We talked about how our words are powerful and how we can use them to either build each other up or year each other down. And how complaining all the time can make others around us unhappy. But when we are cheerful and choose to say things that are positive we can encourage people and brighten their day, even change their own bad attitude. As I sent my oldest to school I challenged him to respond with something good or fun about the snow whenever he heard someone complain. Will you take the challenge too?

Wednesday, October 2, 2013

{Tutorial} No-Sew Canopy & Swaddle


Snow is on the forecast by the end of the week, which meant it was time to warm up the carseat situation. Grab 2 yards of your favorite fleece and let's get started!!

No-Sew Infant Car Seat Canopy
Trim the rough edges off of 1 yard (36" x 60") of fleece. Lay flat on the floor, and with a pair of sharp fabric scissors cut as follows...


1. Cut a 6" square off each corner
2. Cut six 1 inch strips horizontally and vertically on each corner (doesn't have to be exact)
3. Fold the piece in half lengthwise so that it is now 18" x 60". Cut six 1 inch slits at each end. Unfold and cut each slit in the middle to make 12 strips facing the center fold.
4. Fold the piece in half lengthwise so that it is 30" x 18". Cut a 1 inch slit at each edge and two additional slits approximately 10-12 inches apart from the center. You should have four 1 inch slits. Unfold and cut each slit in the middle to make 8 strips facing the center. 

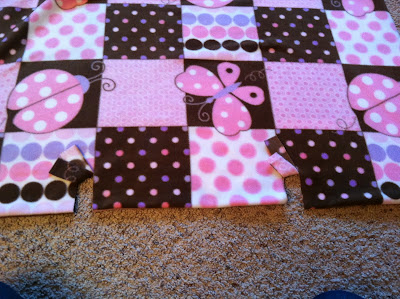
Step 4: Cut two additional slits 10-12" apart in the center
To put the canopy onto the carseat...
1. Lay the canopy onto the carseat lengthwise under the handle, with the handle upright. 
2. Tie the four 1" strips onto the handle. Two on top and one on either side at the hinge. 


3. At the back and front there will be 3 sets of six strips to tie. Starting on the corners tie each corresponding strip together to make the corners fitted and snug. Tie the strips in the center to tighten the canopy under the edge of the carseat. Repeat on the opposite side. 


I love the fitted corners because it seems like the wind always blow the blanket open or off. This way your babe stays warm and cozy and out of the wind. The swaddle is SUPER easy and will seriously take all of 5 minutes to complete...here goes!

No-Sew Infant Car Seat Swaddle
Cut a square of fleece that is 35" x 35". Trim one corner off about 2/3 of the way down so that you have a piece that is a square with three 90 corners and one straight corner from the side you cut. The 'straight corner' will be the top. 

Remove the straps from your car seat. Lay the piece onto your car seat with the straight corner a few inches above the highest row of strap holes. Pressing into the seat so that it lays flat on the back and seat where your baby would sit on top of it. Mark the strap holes by feeling them through the fleece. Cut slits for the straps on the back, sides and bottom. Mine had 9 slits. 

Place the swaddle onto the car seat and rethread the straps. If using a head rest put on last on top of the swaddle. Open the swaddle when you place your baby into the car seat lay them on top. Buckle them in snugly. Then wrap your baby in the blanket tucking in the sides beside them to keep it snug. 


I wish someone would carry me inside covered by a warm fleece canopy and a bundled up in a swaddle!
Related Posts Plugin for WordPress, Blogger...