Thanks for stopping by and spending a moment to read my blog. I am just a simple mom, like you, doing the best she can to raise her children to be happy, healthy, Jesus-loving little humans. I hope that I can pass along to you some of what has been helpful to me. Enjoy & thank you for your comments and words of encouragement when you like what you read. :)
Showing posts with label Spring Cleaning. Show all posts

Tuesday, April 9, 2013

{Spring Cleaning} Steam Clean Your Oven

This one took a bit of elbow grease --- the kitchen is turning out to be alot of work. :p But all the projects that I have done have been worth the time and effort and the results speak for themselves. Take a look...
Steam Clean the Microwave


STEP 1: Remove the crumbs and large pieces with a dry rag.
STEP 2: Place a bowl of water in the microwave and cook for 10 minutes to boil.
STEP 3: CAREFULLY remove the hot water and wipe away any remaining food and stains. The steam should have softened and loosened anything that was left.
STEP 4: While you are at it make sure to clean the outside top and sides.

Steam Clean the Oven

 
STEP 1: Boil a large pot of water on the stove.
STEP 2: Place pot of boiling water CAREFULLY into a cold oven and shut the door. Let steam for 20-30 minutes.
STEP 3: CAREFULLY remove the hot water and wipe away any food and stains. Most of the gunk came off without much effort for me - everything on the door sides and back. Cooked on stains (like the spilled apple pie filling in mine) may need to be scrubbed with baking soda and/or steamed a second time.
STEP 4: Finish by cleaning the outside of the oven with a diluted lemon infused vinegar. Stubborn grease can be easily rubbed away with a paste made from baking soda and water. Polish with glass cleaner. Don't forget to wipe the underside of the range hood above the stove top where lots of grease and splatters are hiding.
STEP 5: And why not, since you are on a roll --- move the stove and sweep/mop underneath.

Sunday, April 7, 2013

{Spring Cleaning} Make Your Fridge Look Like New Again!!

I have to start this post by saying that I am honestly a little bit embarassed - my fridge was absolutely DISGUSTING!! But the fact that I knew that it was counts for something though right?? Thankfully, even though it was so gross it really wasn't that difficult to clean, it just took a while. I even enlisted the help of my 7 year old, who was crazy-proud of himself when we finished (not gonna lie, I was too!!)  He said, "Daddy is gonna ask us why we spent all his money to buy a new fridge!" Plus, the nice thing about using an all-natural cleaning solutions is that I wasn't worried about him helping.

So here is what I did, step by step, so you can make your own fridge can look like new!! :)


STEP 1: Take everything out of the fridge --- EVERYTHING! (We will sort through it all later before we put it back in.)

STEP 2: Take all the shelves and drawers out, so that your fridge is completely bare and you are able to get to the back side and walls of the fridge easily.

STEP 3: Remove any dry mess like crumbs (or my spilled coffee grounds) with a dry rag or vacuum attachments.

Using Lemon Infused Vinegar, make a cleaning solution of 1 part vinegar and 1 part HOT water with just a few drops of dish soap per 2 cups of solution. Swirl to mix and add to a spray bottle.

STEP 4: Wipe down all the surfaces of the fridge with the HOT cleaning solution. The hotter the better, use rubber gloves if you need to. Also, wipe down the outside of you fridge paying close attention to the handles. Use a Magic Eraser for any stains. (I don't have a homemade recipe for the Magic Erasers -- those puppies just work!!)

STEP 5: Time to get serious --- Wipe down all the shelves and drawers, soaking as needed to loosen the gunk in HOT water. You can use your bathtub for the large pieces that won't fit in the sink. Most of the stuff on mine came off after soaking for 10 minutes and wiping down with the cleaning solution without having to scrub too much. Use a butter knife wrapped in a rag or paper towel to get into the egdes and cracks. Towel dry.

STEP 6: Shine all the glass pieces (on both sides of the glass) using a small amount of the cleaning solution and dry newspapers or paper towels.

STEP 7: Reassamble your fridge.

STEP 8: Before putting everything back into the fridge, go through and toss anything that is expired or that you haven't used in more than 1-2 months. Also, wipe down any containers that are sticky so you don't recontaminate the clean fridge with old gunk.

STEP 9: Move the fridge away from the wall. Vacuum the dust from the vent at the back of the fridge and wipe down the walls.

STEP 10: Sweep and mop the floor where the fridge was sitting, then put it back. Did you find any long-lost treasures?? I found a picture of my son that was at least 2 years old and a dozen fun CARS magnets for my youngest to play with!

That's it! Enjoy your SPARKLY CLEAN fridge and maintain the shine by cleaning up messes as you find them, not waiting until next spring when they really start to get gross.

Saturday, April 6, 2013

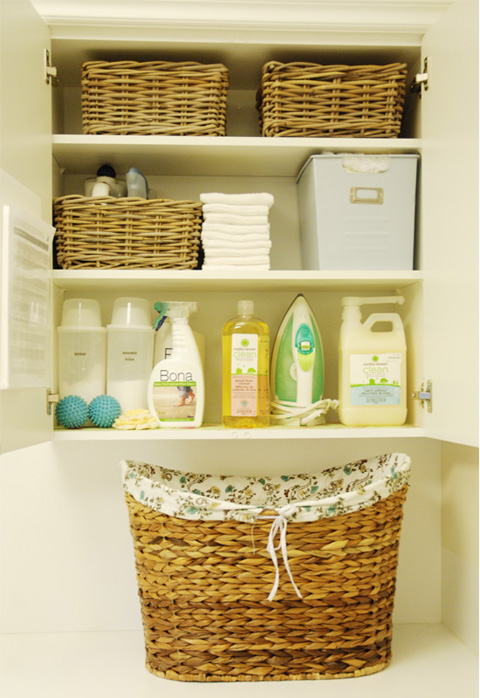
{Spring Cleaning} 5 Simple Laundry Room Makeover Ideas

You can make your laundry room look brand new without spending a fortune to do it! Here are a few projects that you can do easily and without breaking the bank!!

Add a splash of color!
 
 
Disguise the clutter with baskets!
 
 
Hide the mess with simple cabinets!
 
 
Add personality with a new print!
 
 
Get organized!


Tuesday, April 2, 2013

{Spring Cleaning} Homemade Laundry Detergent

Back by popular demand --- here are the two recipes I use everyday for my laundry. I will admit I was a skeptic when I first heard of "homemade detergent" and honestly put off trying it for a really long time. But after staring at the insane price of detergent and softner one day at the store I decided to give it a go. It is VERY easy to make and only takes about 30 minutes. Needless to say, I tried it once and I was hooked --- I make a batch of detergent once every few months and softner about once a month. {LOVE}
 
Time:
15-20 minutes prep
24 hour cooling time for the detergent

Liquid Detergent:
1/2 bar Fels-laundry soap
1/2 cup Borax
3/4 cup Washing Soda (not baking soda)
3 empty gallon milk jugs
Funnel (or top half of a soda bottle)

-Using a cheese grater, shred the Fels-Naptha. Save 1/2 for your next batch. In a large stock pot melt the remaining 1/2 bar of shredded soap with 3 cups water over medium high heat. Add the Borax and Washing Soda, stirring until well mixed. Put 2 cups into each of 3 clean gallon jugs. Add HOT water to 2/3 to 3/4 full. Shake. Remove lids and let sit for 24 hours to thicken. Contents may seperate, shake before each use.
-TO USE IN LAUNDRY: Use 1/8-1/4 cup per load. Good for HE washers and front loaders as well.


Fabric softener:
1 cup Suave Conditioner
2 cups white vinegar
1-2 empty container(s)

Combine conditioner and Vinegar with 3 cups HOT water. Shake well.
-TO USE IN LAUNDRY: Use 2-3 Tbsp per load diluted with water where you would normally place the fabric softener.
-NOTE: Use 1/2-1 cup straight white vinegar for towels to help with mildew smell and to help maintain absorbency.

Sunday, March 31, 2013

Spring Cleaning {Washing Machine}

Have you ever looked closely at your washing machine? Three babies later and a few years of built up fabric softener and grime, mine was DESPERATE to be cleaned. I am happy to say that with a few ingredients you probably already have at home and some elbow grease my washer is now looking brand new - ready to tackle a summer's worth of muddy pants, grass and picnic stains!


Supplies:
2 cups Borax
2 cups white vinegar
1 fresh lemon - juiced
2 gallons boiling water
Scrubbing brush or rough sponge, old toothbrush, q-tips

How To
STEP 1: Bring 1 gallon of water to a boil then pour into your washing machine. Add borax, lemon juice and vinegar. Fill with hot water then let run through a cycle on the fastest/most aggressive cycle you have.

Debris and other gunk loosened from the boiling water
STEP 2: Using a scrubbing brush and hot water, remove any stuck-on fabric softener or grime. Using q-tips and rags wipe down the exterior of your washer, paying close attention to the cracks and crevices where dirt collects. For stubborn stains - scrub with a paste made from baking soda and water.

STEP 3: Boil another gallon of water and pour into the washer - paying attention to any areas that were particularly dirty. Full with hot water and run washer again.

Friday, March 29, 2013

Sneak Peak {Spring Cleaning: Top to Bottom in 30 Minutes a Day}

Typically, I laugh at Spring Cleaning - I can hardly keep up with the everyday cleaning I have to do. But this year, I am nesting. Still don't have time for hours of cleaning on end but I am nesting... so, being the Type-A personality that I am, I made a list. For the month of April we will be focusing on a different area in our homes, with 3 tasks featured on my blog each week! To get you started here is a chart for your fridge...


Thursday, March 21, 2013

Lemon Infused Vinegar

Before you make your next batch of homemade cleaner, infuse your vinegar with lemon! The lemon will make your home spell fresh and adds a boost of cleaning power!!

Lemon Vinegar
Fill a quart sized glass jar with lemon peels (about 3 lemons). Fill jar with white vinegar and let sit for 2 weeks. Strain vinegar and substitute for plain vinegar in the following recipes...

Homemade Glass Cleaner
1 cup water
1/2 cup vinegar
1/2 tsp dish soap

All Purpose Bathroom/Kitchen Cleaner
1 cup vinegar
1/2 cup water
1 tsp tea tree oil

Faucet 'Gunk' Remover
Saturate a towel or rag with undiluted vinegar and wrap around the base of the faucet to remove built up 'gunk'. Let sit for 1-2 hours then wipe clean. Remove stubborn material with a toothbrush. Rinse and dry.

Related Posts Plugin for WordPress, Blogger...